Basics of the Graph Editor
Make a animation of a ball bouncing twice.
Open the Graph Editor.
Window > Animation Editors > Graph Editor...
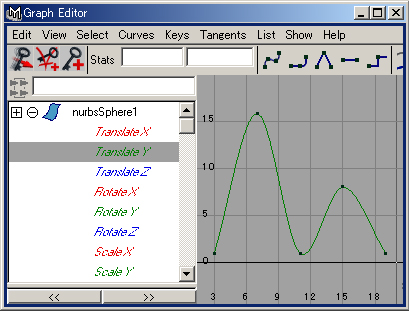
Select the Translate Y channel and press f (View > Frame Selection)
The tangent is Clamped in the default as shown in figure above.
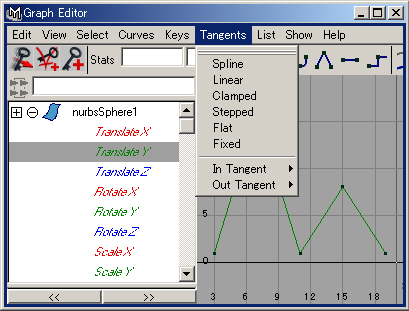
Select the Transelate Y channel and change the Tangent Linear.
It will be as above.
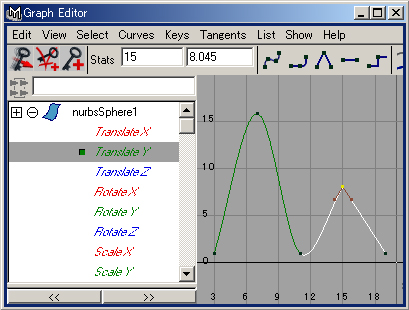
You can also change the Tangent at a keyframe.
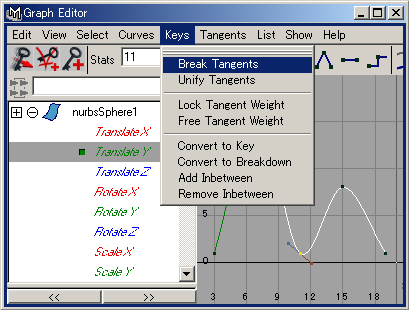
Select a keyframe and Keys > Breake Tangents
Select the Translate Tool in the Tool Box.

With
 mouse middle botton change the bars as above.
→
The impression of animation changed.
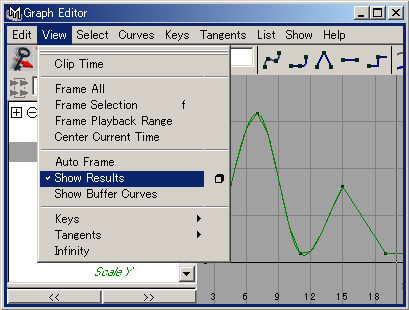
Check View > Show Results
The extension of the curve appears.
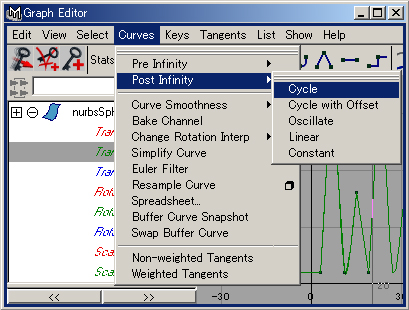
Select Curves > Post Infinity > Cycle
The curve pattern will be repeated after the last keyframe.
Select Curves > Pre Infinity > Cycle
The curve pattern will be repeated before the first keyframe.
The curve before and after keyframes are changed.
The default setting of Curves > Post Infinity > and
Curves > Pre Infinity >
is Constant.
Japanese article
Maya tutorials:Graph Editor

Need more information about graph editor.
If you want information more,
I will add a more detailed explanation.
Thank you for your comment.
hi,
this is a nice tutorial... i was searching for graph editor tutorials every where.. at last got here to see one...thank you.
Thank you for your comment.
excellent
Thank you for your comment.
Hi, nice tutorial. Can you provide more tutorials about graph editor which explains how to use other functions including the use of various key icons shown at top of the graph editor. Thanks.
I will write more.
In Graph Editor:
1. Once you set up one cycle and then use "Curves > Post Infinity > Cycle" is there any way to limit the number of cycles to say 5 or 12 etc ?
2. If you change the tanget's handle length and/or angle how can you change them back to their default values ?
>1. Once you set up one cycle and then use "Curves > Post Infinity > Cycle" is there any way to limit the number of cycles to say 5 or 12 etc ?
You can't do it.
You can do is ...
Select "Edit > Keys > Bake Simulation",
set option(Time range and Sample by),
and bake the cycles.
>2. If you change the tanget's handle length and/or angle how can you change them back to their default values ?
Select the key, select "Tangents > Clamped" in Graph Editor.
Default tangents are set in Preferences.
Hello, that is a good tutorial. Have questions about Set Driven key but did not know where to place so, put it here.
If you have several objects set up using Set Driven key panel where:
Driver OBJECT 1 attribute drives OBJECT 2 attribute
and
Driver OBJECT 2 drives OBJECT 3
also
Driver OBJECT 1 drives OBJECT 4.
If you want to replace OBJECT 1 with new OBJECT 5 so that OBJECT 5 drives OBJECTs 2 and 3 above, do you need to go through the Set Driven Key panel and manually set up the Driver and Driven objects and their attributes or is there a way of substituting OBJECT 5 in place of OBJECT 1 without having to set everything up again manually (if you can do it this way can you give the instructions for this)
Also, if you have used the Set Driven Key method to set up Driver and Driven objects and their attributes, how can you list all those Driver / Driven objects and their attributes?
Finally, if you have 2 edges (edges A and B) next to each other on a polygon object, you can curve snap the vertices on edge A to a curve, and then manually move the vertices on edge B closer to edge A to keep the original distance between the 2 edges.
Is there a way of curve snapping the vertices of edge A to a curve AND move the vertices on edge B at the same time so that the same distance is kept between the 2 edges.
Thanks in advance.
> If you want to replace OBJECT 1 with new OBJECT 5 so that OBJECT 5
> drives OBJECTs 2 and 3 above, do you need to go through the Set
> Driven Key panel and manually set up the Driver and Driven objects
> and their attributes or is there a way of substituting OBJECT 5 in
> place of OBJECT 1 without having to set everything up again manually
> (if you can do it this way can you give the instructions for this)
You must set everything up again manually.
Or you can copy all Mel command of the process from script editor,
rename object names and repeat the process.
> Also, if you have used the Set Driven Key method to set up Driver and
> Driven objects and their attributes, how can you list all those
> Driver / Driven objects and their attributes?
You can list all object in Hypergraph with "Input and Output Connections", but you can't list their attributes.
It is inconvenient.
> Finally, if you have 2 edges (edges A and B) next to each other on a
> polygon object, you can curve snap the vertices on edge A to a curve,
> and then manually move the vertices on edge B closer to edge A to
> keep the original distance between the 2 edges.
> Is there a way of curve snapping the vertices of edge A to a curve
> AND move the vertices on edge B at the same time so that the same
> distance is kept between the 2 edges.
You can't keep distance with curve snapping.
it is very nice tuts for students.........
thank you, was helpful step by step tutorial..;p
nice and less descriptive tutorial